
Booklet / Manual Research
Task 9 - Illustrators Research
To gauge what the current available illustration styles are around at the moment within the child-education market, I will be looking at the most popular books used within schools for children between 11 to 18. I will also be looking at the most popular illustrated educational books on the market as of 2020-2021. From this I can establish a design style and work out how best to communicate all of the required information for outdoor education (containing the required information for the Scottish Curriculum for Excellence).
After viewing https://theculturetrip.com/north-america/usa/articles/top-9-children-s-books-illustrators/ I managed to start to find a list of Illustrators with varing art styles, the following names are deemed as the top 9 children's book illustrators of modern era.
-
Maurice Sendak - famous for "Where the Wild Things Are".
-
Barbara McClintock - famous for "Adèle & Simon" and the Jim Henderson's Television Series "Fraggle Rock".
-
Laura Carlin - famous for "A world of Your Own" as well as winning the 2011 V&A illustration award.
-
Sophie Blackall - famous for "Meet Wild Boars".
-
Dan Santat - famous for "The Adventures of Beekle: The Unimaginary Friend" which got Dan awarded the 2015 Caldecott Medal for his work.
-
Brian Floca - famous for the 2014 Caldecott Medal winner "Locomotive".
-
Laura Vaccaro Seeger - famous for "First The Egg" and "Lemons Are Not Red" a book that educates children on colours.
-
Jo Empson - famous for "Rabbityness" a book featuring bold design and colours, and plays tribute to Jo's Graphic Design background.
-
Theodor Seuss Geisel - Famous for "The Cat In The Hat" Dr. Seuss uses basic colour palettes and a sketchy bold style with exaggerated proportions.
Children specific Outdoor Education and Play books:
-
Play the Forest School Way: Woodland Games and Crafts for Adventurous Kids Paperback – Illustrated, 27 May 2016 (by Jane Worroll (Author), Peter Houghton (Author)) - Age Range 8-12
-
How to Raise a Wild Child: The Art and Science of Falling in Love with Nature - Book by Scott D. Sampson 2015
Colour Palette:
All of the outdoor learning books with illustrations follow a simple nature inspired colour palette - with use of browns, greens, blues and what would be considered as earthy tones. I will follow a similar colour scheme within my own booklet.
Here is a sample colour palette made on Photoshop:

Task 9.1 - What Content Should be In the Work Booklet?
How to action a process of learning:
All of the methodology I will follow will be based upon the information fouond in the following document https://education.gov.scot/Documents/cfe-through-outdoor-learning.pdf (the Scottish Curriculum for Excellence Through Outdoor Learning)
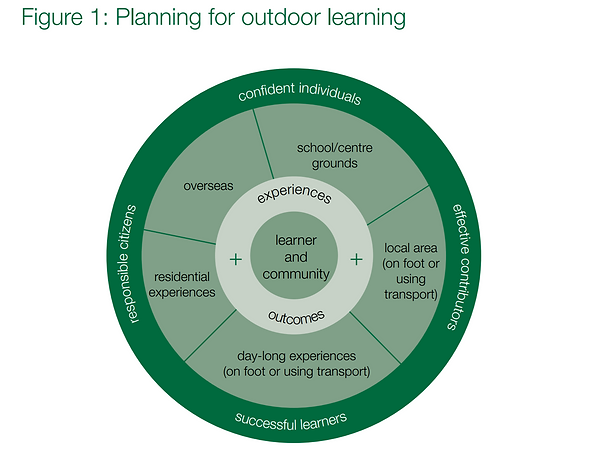
The image in Green was taken from the PDF listed in the link above. This is a fundamental planning methodology used to form an outdoor activity.
The diagram works from the inside out, where each task done from the inside out forms the final outcome for the children involved (confident individuals, responsible citizens, successful learners and effective contributors). This diagram is said to be effective for learners from age 3 to 18.
There should be a focus on working as a team, to help aid in life after 18, working within a higher education setting or within a employment setting.
Actioning a Plan - Staged Approached
Stage 1 - Task and Objective(s)
-
Much like in design the task or 'breif' should be made clear to the participants of the process.
-
The objective(s) must be made clear to the participants, as they need to be aware of what they must achieve and within a set time frame.
-
The task can be spread out over a few days, with being in the outdoors there can be a great distance travelled outside within a campsite or forrest, and thus more time to complete an activity.
-
Always bring back into context how the task will make the participants confident, successful learners, responsible and effective at contributing.
-
Must be suitable for a full class of approx 20-30 participants (including leaders and tutors).
Stage 2 - Suggested questions to reflect on when planning
-
Which experiences will have more impact on learning if done outdoors?
-
How can learning outdoors enhance and deepen learning within curriculum areas?
-
Which experiences are best suited to a combination of indoor and outdoor learning?
-
How can learning indoors best be consolidated, progressed or enhanced using the outdoors?
-
What opportunities exist for linking learning across the curriculum?
(Source - document https://education.gov.scot/Documents/cfe-through-outdoor-learning.pdf (the Scottish Curriculum for Excellence Through Outdoor Learning))
Stage 3 - Risk Assessment / Health and Safety
In planning and considering risks and benefits it is important to consider:
-
Is the level of challenge appropriate to the learner group?
-
How will risks be assessed and balanced against the benefits that can be expected?
-
Can the rationale for this experience be justified even if events don’t go according to plan?
-
Are the management arrangements appropriate for the location selected?
-
Are the leadership and supervisory staff appropriately skilled, qualified and experienced?
-
How do we communicate with parents and carers?
-
Could we benefit from enrolling partners?
-
Are there any relevant examples of good practice that we can draw on?
A Risk Assessment does not mean eliminating all risk, it means balancing risk vs reward. The law requires leaders to manage significant risk as reasonably practical and learners and participants should be at the centre of the risk assessment from the start of the process.
(Source - document https://education.gov.scot/Documents/cfe-through-outdoor-learning.pdf (the Scottish Curriculum for Excellence Through Outdoor Learning))
Stage 4 - Working With Partners
-
Can the Young participants be involved in planning the task - such as route planning in a map?
-
Can the task be done as a group?
-
Professional partners from outside organisations with experience in the field can help aid in the process of learning and provide new routes of learning to the participants.
Stage 5 - Task evaluation, participant satisfaction, assessment of attained skills:
-
Recognise achievement and attainment
-
Build up a 'learning portfolio' of the participants work, look for personal development and skill development
-
Has the participant completed the task, and how well has the task been performed?
-
How can the participant improve, can they learn from other participants?
-
Can the activities be linked to a reward scheme? Look at D0fE, The John Muir Award and Millenium Volunteer Award. Nationally recognised awards can add value to a child's education for applications in 'the real world'
Stage 6 - Evaluation / Self-evaluation
-
This helps to evaluate the schools impact on the education of a child when educating them in the outdoors, how well has the outdoor education benefitted the child and how well have the tasks been received by the participants involved?
-
What do I need to know?
-
How can I find out more?
-
How can I integrate new learning into my practice?
-
How can I share my learning?
Task 9.2 - Layout and Page Design
Layout:
This website helped gain insights into how to layout and organise information on a book page in a manageable and logical mannor: https://visme.co/blog/layout-design/
The following information is from the above link - it mainly focuses on how to lay out text, however the information here could be applied to imagery.
Format
The format is the full area where the final design will be laid out. In print design, the format is the page and in web design the format is the browser window.
Margin
Margins are the empty spaces between the edges of the format and the content. The size of the margins is what gives the content a general shape, usually a rectangle.
Flowlines
Flowlines are horizontal lines that separate the different sections of a grid into parallel bands. They help the reader follow the content of the layout. Flowlines also create stopping points, or edges for the elements to be placed on. Some flowlines are called hang lines and others are called baselines.
Modules
Modules are the building blocks of any grid. They are the spaces created between the flowlines and vertical lines. Vertical groups of modules together create columns. Horizontal groups create rows.
Spatial Zones or Regions
Groups of adjacent modules in vertical and horizontal areas create spatial zones or regions. A vertical region can hold a block of text, a horizontal region can hold a video. Regions can be organized proportionally or used to create overlapping zones.
Columns
Columns are vertical spatial zones or regions that fit fully from the top to the bottom margin.
Rows
Rows are horizontal spatial zones that fit fully from the left to right margin.
Gutters
The spaces between rows and columns are called gutters. These should always be equal between columns or rows, in order to maintain a visual balance.
Markers
Markers are areas inside the running header or footer that mark the exact place where repeating information is placed from page to page.
Task 9.3 - Layout and Page Design - Drafting
![20210205_125607[6743].jpg](https://static.wixstatic.com/media/4fb859_f067e936070d43e8baf5a98970d3a22e~mv2.jpg/v1/fill/w_978,h_449,al_c,q_85,usm_0.66_1.00_0.01,enc_avif,quality_auto/20210205_125607%5B6743%5D.jpg)
The pages have been sectioned out in to 9 basic blocks, with a title block situated at the top of the page, there will be a margin evenly spaced around the border of the page and a reasonable gutter between elements on the page.
Keeping to the rule of thirds, I will use three image blocks and three text boxes, images will have larger blocks on the page to emphasise the importance of them on the page to the viewer.
The tasks will run in order of the stages listed in task 9.1 above, this will ensure that each process of the book is backed by the formalities of the outdoor learning guide in the scottish curriculum for excellence.
After feedback, I received from Andrew Cook on the user interface and layout of the booklet, I went back to the drawing board and considered the following structure - see right image:
Feedback included:
-
Task sections of the booklet should be more 'free flowing' and use the order of imagery and text to tell a story, make there be a background context to the tasks, such as a survival game.
-
The Three box 'Zigzag' layout for the skills pages work really well and allow the skill instructions to be very clear.
-
Bold lines and basic colour palette should definitely be the way forward when designing the illustrations for the booklet.
After feedback, I received from Fraser Bruce about the context and user/curriculum advice I will follow up my design choices with further information
-
Could the booklet link to an online community?
-
Do a basic illustrator/indesign template.
-
Don't make it feel like a homework book.
-
Don't over-simplify how to incorporate the Maths and English extension tasks
-
Think about "Eco-Literature"
-
Experiential learning.
-
What can the participants take home with them?
-
Series of booklets?
-
Add on packages?
![20210211_123015[7025].jpg](https://static.wixstatic.com/media/4fb859_5138b47acf044a1aa4d07287122d99d6~mv2.jpg/v1/fill/w_600,h_820,al_c,q_85,usm_0.66_1.00_0.01,enc_avif,quality_auto/20210211_123015%5B7025%5D.jpg)
Task 9.4 - Layout and Page Design - INDESIGN
Using the feedback above, I made an InDesign template to form the basic structure and layout for the booklet. The structure is as follows:
-
Three evenly spaced columns form the basic net for the text and the images boxes.
-
Informational pages and the front and back cover follow a basic two Large text box rows on the top and bottom of the page to form a frame work for a large Image box centered in the page.
-
Carving and Knots - pages follow the 'Zigzag' three box structure as discussed above.
-
The Task pages are yet to be fully formed. However, I feel as though the task pages format will be dictated by the task itself.
Below is the current page layout of the booklet. After speaking to Paula Cowie (an outdoor educator that works with Scottish pupils that age from 11-17), I will add a few more necessary instructional guides on Fire-making and basic first aid. She also guided me to look at the Coyote Mentoring guide for outdoor learning and education to help form my task booklet. She said My booklet would be most appropriate for the ages of 15-17. Acknowledging this information, I decided to use a very basic and uniform colour palette, with only two fonts used throughout to make the booklet look less patronizing and make it easy to use and read.
The next stage is to plan how to build a narrative for the Task pages, where the narrative is broken down into 4 parts.


Two pages to add - Fire starting and First aid
Might be worth adding a page for explaining the 'survival situation'


Task 9.5 - Task Narrative Development
To make an effective booklet for 15-18 year olds to complete, it needs to fit within the educational development of that group-set of people. One of the most important development features of a 15-18 year olds learning is the ability to action projects and give response in their own way. This can be done by giving the 15-18 year olds a situation, such as they are stuck in the woods and they have to survive a night before being rescued - this is what allows them to respond and action tasks. This in turn will help them become confident learners and responsible citizens.
This being said, how do you build tasks to do within a narrative?
-
Start with a situation.
-
What do you need to do to succeed in the situation.
-
Build the steps for success into broken down tasks.
-
Build each task by breaking it down into more basic steps that allows the guide to explain to the participants how to do something.
-
Allow for self assessment and self evaluation, so that the participants can improve their skills as they go.
-
Allow for imagination and picturing the situation in the heads of the participants, allowing them to fully immerse themselves in the tasks.